Planting Information
Planting Bare Root Trees and Shrubs
Bare root stock is usually shipped as a one or two year old seedling. It will most likely look like a small stick with roots and very few (if any) branches, depending on the species.
When you receive your plants they should be planted in their final location or healed into some soil until you are ready to plant them. To heal them in, find a cool, shaded location. Simply dig a hole large enough to fit all the roots and place the whole bundle in. Fill the hole back in with soil covering the roots and water it thoroughly. The sooner they are planted in their final location, the better – but plants can be stored like this until they begin to break dormancy. You can also heal them into pots. Just make sure they don’t dry out, and try to avoid excessive watering as well.
During the planting process, it is critical that the roots don’t dry out. Planting on a cloudy day is ideal. While in the field, leave your trees in a bucket of water with the roots fully submerged. Plant them one at a time so they are only out of the water for a couple minutes before they are in soil.
- Determine your planting location: Avoid excessively damp spots. Trees cannot thrive and will most likely die in areas that are wet all year long. A 3 foot diameter by at least 1 foot high mound can be created to form a planting spot if a seasonally wet site needs to be modified to accept a planting.
- Dig a hole: Determine the size of your planting hole by extending some of the roots horizontally. This will show you how wide to make the hole. You want to make sure all the lateral branches on the roots are fully extended and directed away from their point of origin. What you don’t want to do is curl a root back around just to fit it in the hole. If any of the roots are so long that the hole would be excessively large, then they can be pruned off. This won’t hurt the tree much, if at all. It’s helpful to have a tarp with you to place the dug-out soil on. That way you won’t lose any soil to the surrounding grass and vegetation when you fill the hole back in.
- Plant: Locate where the trunk to root transition is based on the color change. You want this transition to be even with the ground level. With one hand, hold the tree in the hole. With the other hand begin scooping soil back into the hole. Only fill up the hole in tiers of 4” or so of soil at a time. This way you can spread the roots out into the proper position (see picture below). Firm the soil in each tier as you go to eliminate air pockets. You want to press pretty hard so the tree is well anchored in the wind. A light step on the loose soil is enough for this but don’t stomp on it.
- Water: I like to water every new planting with about a half bucket of water. It’s important that the roots remain moist while they are going through this transplant shock. The water also helps settle the soil and fill any voids.
- Mulch: Add an inch or two of good compost. Then apply some kind of mulch. I prefer wood chips and I lay them down at least 4” thick in a 3’ diameter circle. The mulch has a three-fold purpose: It retains water, smothers out other vegetation and it feeds the soil microbes. It’s amazing how well the wood chips hold the water in the soil. Even during a really dry summer I never feel the need to water any new plantings.
- Protection: Deer, rabbits, and voles (meadow mice) will all do damage to young trees. To protect against deer and rabbits, a circle of 4’ to 5’ high garden fencing around the tree works well. An 8’ long section of fence makes about a 2.5’ diameter circle. Protection from voles can be accomplished by rolling up sections of window screen. I cut a 1’ x 1’ square of aluminum window screen and roll it into a loose cylinder. It will hold its shape after rolled up like this and will be easy to wrap around the base of the tree. To hold it in place, I bury it down in the mulch about an inch or two. Vole protection done this way will not girdle the tree as it grows, because the screen roll will widen with the growth of the tree. There are many alternatives to tree protections that work just as well as the methods I’ve described, but this is my preferred method.
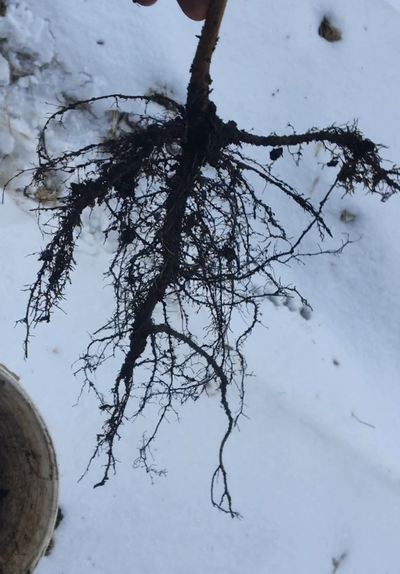
Notice how the lateral roots are coming off of the main tap root. These roots should be positioned in the hole so they are radiating away from the tap root. Filling the hole with a little soil at a time allows you to configure them in this manner as you work your way up.